This tutorial assumes you’re using cPanel, one of the most popular hosting control panels. If you’re on a shared hosting plan, there’s a good chance your host uses cPanel (some popular hosts, like DreamHost and GoDaddy, don’t). But even if you don’t have cPanel, your control panel will probably let you create cron jobs without knowing Unix, in a way similar to what I’ll describe below.
Note:If you’re looking for a host, it’s a good idea to find one that uses cPanel; once you become familiar with it, it’s easier to change hosts if you find out yours sucks and you have to move to another one (be sure to read How to Find a Web Host That Doesn’t Suck).
Let’s get started. Log in to your cPanel and look for the Cron Jobs icon:
cPanel Cron Jobs
Click on the image and you’ll be asked to choose your experience level. If you’re reading this, you want to click on Standard.
Creating a Cron Job
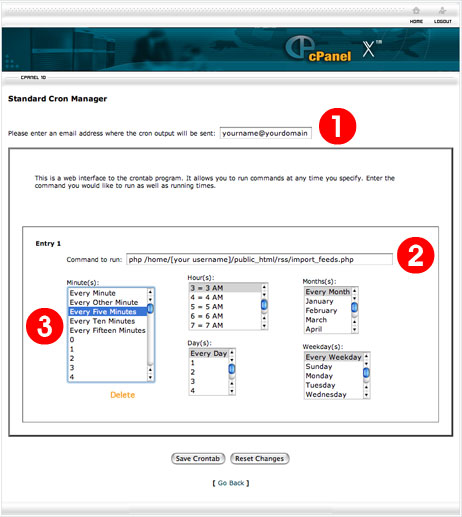
Now that you’re at the Standard Cron Manager, let’s create a cron job. You can set a job to run at a specific interval or at a specific times. Creating a cron job requires only three simple steps (see picture below):
Cron job
1. Enter your email address where it says: Please enter an email address where the cron output will be sent. Cron will send you a message when the job is executed, so you’ll know if there are any errors.
2. In the Command to run: field, enter the full path to your script (you may need to check with your host for this).
If you want to run a php file, the command will begin with php. For example, if you want to run RSS Import to update your Pligg feeds, you’d enter php and the path to your import_feeds.php file.
On AN Hosting, your path would look something like this:
If you want to run the automatic backup script, which backs up your MySQL database and emails a copy to you (see 8 MySQL Backup Strategies for WordPress Bloggers (And Others), strategy #7), you’d enter /bin/sh (since this is a shell script), and the path to your script.
On AN Hosting, your path would look something like this:
/bin/sh /home/[your username]/etc/upstart_cron_backup.sh
3. Now you need to set the schedule.
* Set the Minute(s). You can set a short interval here, or minutes of the hour (you can select multiple items in this—and the other— boxes by using the Shift and Command keys). If you don’t care about minutes, leave this set to 0).
If you want to test things, set this to run Every Five Minutes. This is a good interval for running the script, checking your email for errors, and changing settings before your inbox gets inundated with cron messages.
* Set the Hour(s). If you’re creating a cron job to run RSS Import, you might want to set this to Every Hour. If you’re setting up a backup script, you might choose an hour in the middle of the night for nightly backups.
* Set the Day(s). You’ll probably want to leave this set to Every Day, but you can also choose specific days of the month.
* Set the Weekday(s).
* Set the Month(s).
When you’ve set the schedule, your cron job is done. Click the Save Crontab button. If you set it to a short interval for testing, you should have an email with your output within a few minutes. If there’s an error (usually a problem with your path), check your settings.